Saturday, April 23, 2016
Win a Boyfriend Brownies
Here's the scenerio: Cute boy. You want to date him.
Follow my simple, non-customized and over generalized "Win a Boyfriend" plan! This will only cost you a couple bucks, some blood, sweat, tears, and possibly frustration. This plan works! I have won about 34,581 boyfriends from these brownies.
(Disclaimer: this is a lie. I've actually never won a boyfriend from this recipe- but whatevs)
Okay so here's what you do. First, shoot him a text and tell him you had some spare time so you figured you'd just whip something up in the kitchen real quick (this will make you seem domestic AF). Secondly, tell him you made extras so it's no big deal to just drop some off at his house! (He doesn't have to know you purposely doubled the batch).
Boom, Immediate invite to come over. Not only do you get to have an encounter with him, but you'll blow his socks off with how impressive you are in the kitchen! (; If he says no to this invitation, he is either 1) gay. 2) actually busy or 3) not worth your time. I've never had a guy turn it down, so you shouldn't have a problem, if you do.., IDK SOS, you're on your own! If you're thinking, "wait I lack those baking skills...", don't you fret. This recipe is fool proof and bound to work! Dump those doubts and win a boyfriend!
First you start out making the basic brownie batter. Melt butter in a glass bowl, add sugar and mix. Next add cocoa and eggs. Continue to stir in flour, salt, baking soda, and vanilla. This will be a really thick batter. That's okay!
Spread evenly into a greased 9x13 inch glass pan.
Next, mix up the cream cheese marbling (aka the best part that sets you apart from all those other basic bitches who just use a box mix and think that will get them anywhere in life). You'll start by beating the cream cheese. Next add the sugar, salt and vanilla and beat until smooth. Make sure there are no lumps.
Drop cream cheese topping onto brownie batter and use a knife to swirl it in. After this looks excellent and girlfriend material, sprinkle some chocolate chips over the top just to make yourself look better than you actually are. Make sure you find that fine line between "just right" and "trying to hard"
actually screw it
If you're looking at this recipe with the motive to actually do this, you are trying to hard. But that's okay (':
Cream Cheese Brownies
Brownies:
1 cup butter
2 cups sugar
4 heaping tablespoons cocoa powder
4 eggs
2 cups flour
1/2 teaspoon salt
1 teaspoon vanilla
Cream Cheese Swirl:
1 8 ounce block cream cheese
1/2 cup sugar
1/8 teaspoon salt
1 egg
Bake at 350 degrees for 25-35 minutes. Wait until cool to cut into squares, then deliver to all the hotties. Best of luck!(:
Thursday, April 7, 2016
Shane's Wilderness Cookies
I recently had the opportunity to go backpacking in Southern Utah. I went with some family and friends and it was remarkable. We saw some incredible Indian Ruins and shared many laughs. Some highlights of the trip were as follows:
- cheap motels
-sitting in dirt
-Caputo's Olive oil and dipping bread
-Clint's Barbarian Quotes. Such as "Speaking of, my ex wife was exactly like Satan!" and "I'm telling you buddy, we are going to be such great friends if you can get me deals"
-Shane's cookies
When it comes to backpacking, quality meals are slim and far between. You can pack so many cup-o-noodles and can only take so much tuna before you really crave good, homecooked food.
Shane saved the day on this trip. He is quite the high class diner and he won't let the wilderness stop him. He decided he would whip up a batch of these hearty, durable, yet delicious cookies before our trip.
They are super easy to make and lasted the whole three days. They tasted fresh and they filled you up. You just start with a basic oatmeal cookie dough. For convenience sake, Shane opted for a pre-measured Betty Crocker Oatmeal Cookie Mix. After mixing that up according to package directions, you add coconut flakes, chocolate chips, and a heaping amount of chopped walnuts. Boy are these cookies delicious.
The recipe is as follows
1 Oatmeal Cookie Mix (mix according to package)
1/2 cup chocolate chips
1/4 cup shredded coconut flakes
3/4 cup walnuts
Mix all the ingredients in a bowl and scoop out onto a greased cookie sheet. Bake at 350 degrees for 12-15 minutes. Let cool completely before putting in a plastic bag and packing.
Happy Camping!
Sunday, March 13, 2016
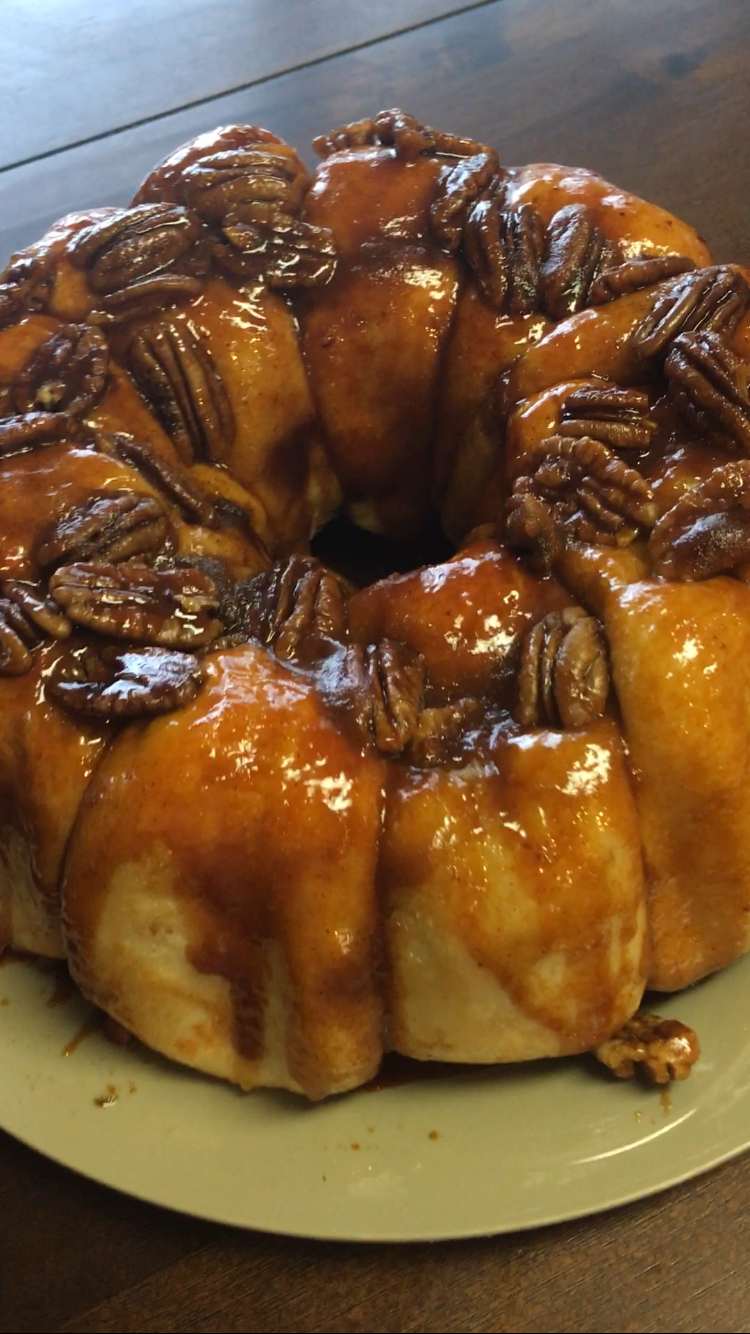
Sticky Buns That Are So Easy and Remarkably Tasty, Its Unreal.
This is a Sunday staple at the Twede Home. We look forward to having them every week. Are they a dessert or simply a side roll? It's still up in the air. Regardless of what it's classified as, its so good we all devour them.
They take next to no time to put together. You just dump tons of sugar and butter onto pre-made roll dough and then let it raise. The wait for them to raise and then bake is what takes the longest! When it bakes the sugar and butter form a sort of caramel that coat each role. Everyone will think you've spent hours working on these.
So here's the recipe to these Unreal Sticky Buns:
1/2 cup pecan halves
1 small package *COOK AND SERVE* butterscotch pudding
3/4 cup brown sugar
1 teaspoon cinnamon
1 stick butter (melted)
12 Texas Rhodes Rolls
Spray a bundt pan with nonstick cooking spray, then dump pecans into bottom. Next add the 12 rolls on top. Then sprinkle the brown sugar, cinnamon, and dry pudding powder over the rolls. Lastly, drizzle butter over the top of all of this then cover with plastic wrap. Let the rolls raise until they are about doubled in size. Bake at 350 degrees for 20-30 minutes. Turn over onto a sturdy plate and enjoy!
Alisa's notes: I add more pecans than just the half cup. When the rolls are done they get glazed with all the sugar and they are the best part. So I don't skimp on those. Also MAKE SURE YOU DO NOT USE INSTANT PUDDING. It will ruin the rolls and make the glaze goopy and your rolls chewy. It needs to be the Cook and Serve type unless you want gross rolls and an angry family.
Here's a video of how I put it all together!
Sunday, February 28, 2016
Lake Powell Dutch Oven Cake
I’m feeling a bit nostalgic today.
I spend way too much of my nonexistent free time looking through
pictures spent at Lake Powell in past years. It’s my favorite place on earth if you haven’t
picked that up from my past posts.
Today I decided to whip up a Crandall Family Reunion Lake Powell trademark. Every year we eat Dutch oven cobblers after dinner one of the last few nights. They usually
consist of a bag of frozen berries and a cake mix. However, my personal favorite
is the Dutch Oven Chocolate Cobbler. I don’t even know why it's called a cobbler when it's more like a chocolate lava cake.
BUT IT IS SO GOOD.
Especially
when you’ve spent the week camping. There is nothing better than warm, melt in
your mouth, fresh chocolate cake.
Since we eat it on the lake, it is obviously super simple
and easy. All it requires is three things:
1. Marshmallows
2. Chocolate Pudding
3. Devil's Food Cake Mix
Yup. Super easy. So here is how you can make this yourself at home! If you are making it in an actual dutch oven, you'll want to view the
recipe below because it is a little different. But for the
domestic, non-camping scenario, you can still enjoy this delicacy.
You start by dumping half of a bag of mini marshmallows into
the bottom of a greased 9x13 glass pan. Next, mix up a small (3.9 ounce)
package of instant chocolate pudding. Pour that over the marshmallows.
Keep in mind that you have a whole package of pudding at the
bottom of this. Therefore no matter what, it will be wobbly and not firm like
most cakes you make. That’s fine, just make sure the cake is baked on the top.
When it's finished, you might want to wait a little for it to set up, or you can just go at it. You can’t really cut it into pieces because it’s a lava cake, so we just
scoop it out into a bowl, dump a whole lot of whipped cream on it, and eat it
with a spoon. If that doesn’t sound like heaven to you, no one should trust
your opinion.
Dutch Oven Chocolate Cake (in the actual Dutch oven)
2 Devils Food Cake mixes (prepared according to packages)
large package instant chocolate pudding (prepared
according to directions)
*or you can use the equivalent in pudding cups if you don’t
have a way to bring milk and prepare it there)
1 bag miniature marshmallows
Follow the directions stated above, however cooking
times may vary. Happy Camping(:
Tuesday, February 16, 2016
Healthy Vegan Pumpkin Chocolate Chip Muffins
I had my first vegan baking experience the other day (': It was really just like any other baking experience I had, no worries you guys it worked out wonderfully!
I have the privilege of nannying the two cutest boys. Not only do they babysit pet alligators, double as ninja turtles, and have an obsession with jumping on air mattresses, but they are quite the pastry chefs.
They insisted on their mom's recipe for pumpkin chocolate chip muffins, let me just tell you, it's a gem. They are super healthy and it doesn't come at the expense of losing any of the tasty pumpkin flavor. You won't even be able to tell that they are vegan.
For me, I have quite the sweet tooth and I would recommend adding more maple syrup or sugar to the recipe. However, without they were still worth eating a dozen of them and you won't even feel guilty after!
The recipe goes as follows:
1 cup whole wheat flour
1 teaspoon baking powder
1/2 teaspoon baking soda
1 teaspoon cinnamon
1/4 teaspoon ginger
pinch of allspice
pinch of cloves
1 cup pumpkin
1/2 cup pure maple syrup
(1/4+ cup sugar, optional)
1/3 cup coconut oil (melted)
1 teaspoon vanilla
3/4 cup dark chocolate chips
In a large bowl, whisk together dry ingredients. In liquid measuring cup combine pumpkin, syrup, coconut oil and vanilla. Mix together wet and dry ingredients. Stir in chocolate chips. Scoop into greased muffin tin and bake at 350 degrees for 12-15 minutes.
Friday, February 5, 2016
A Toddler's Favorite Tavern
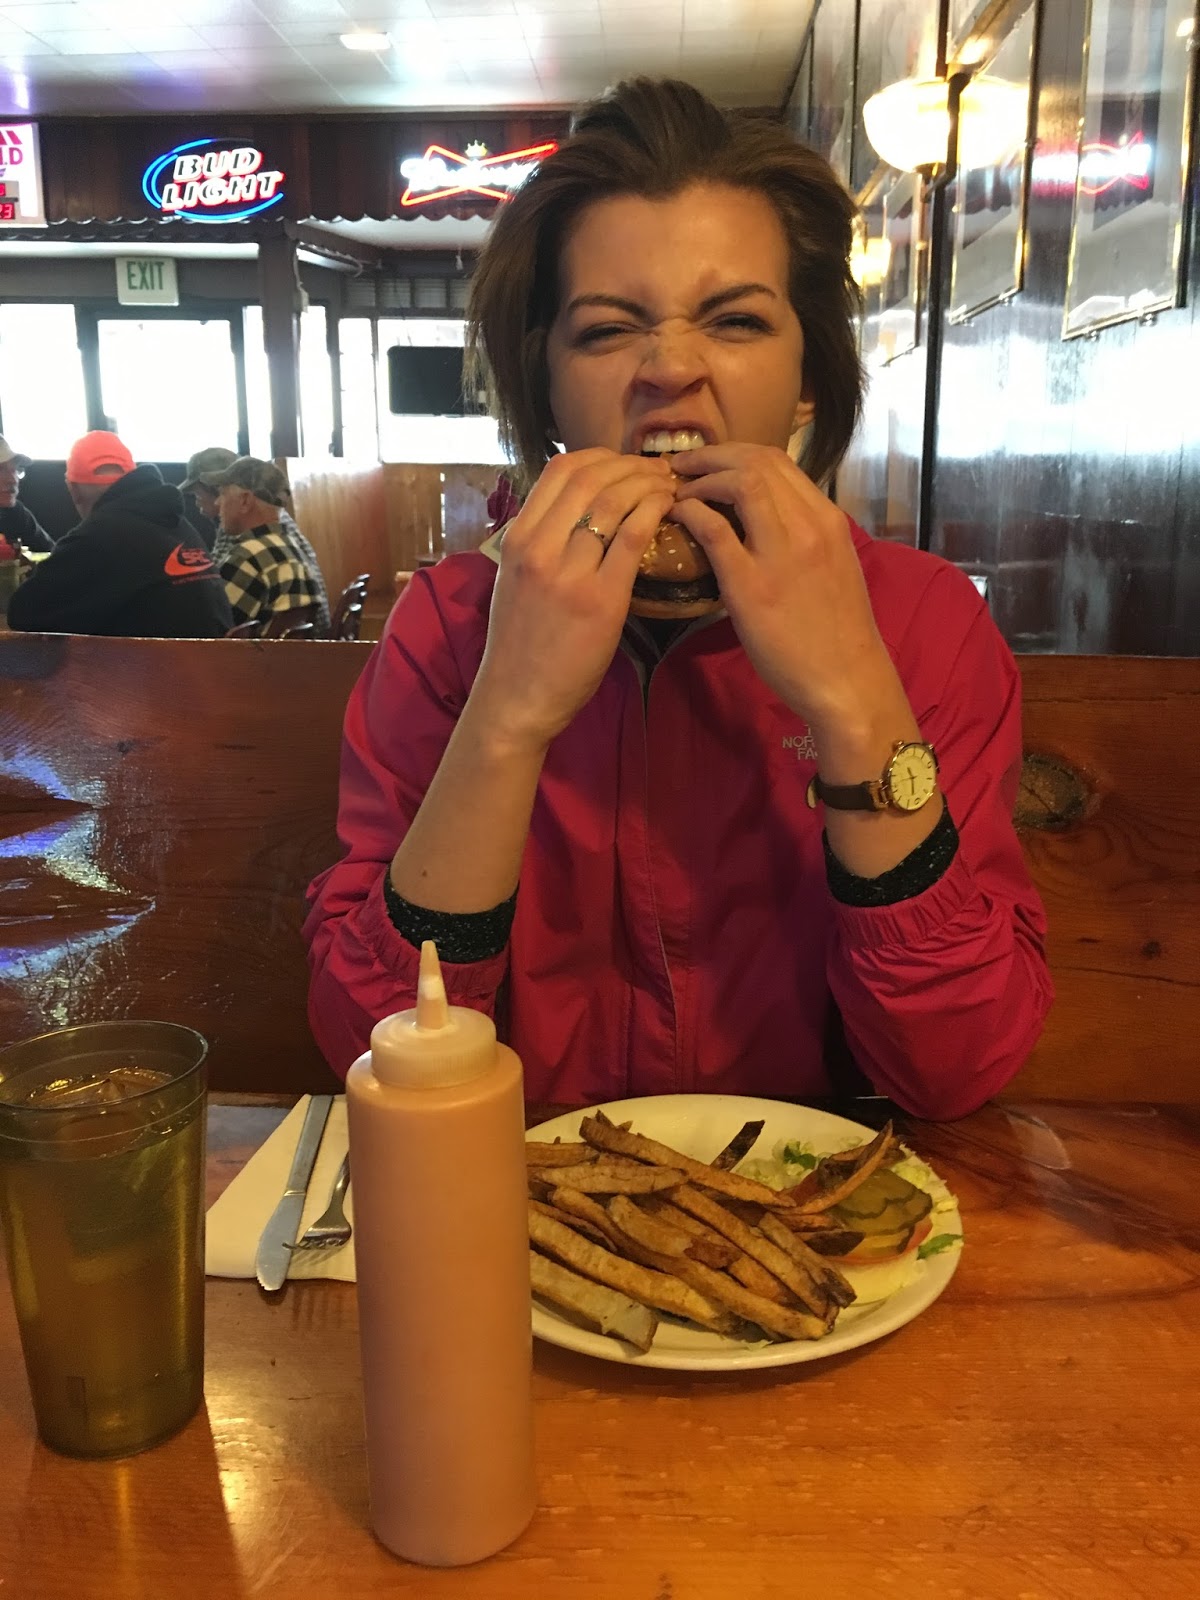
Ever since I was born we have been going on family vacations to Lake Powell. At some point in these excursions it became tradition to stop at Ray's Tavern on the way home. It's located in Green River, Utah, so after a week spent on the lake, we would always finish the trip with a nice, thick burger. So, since I was in diapers, I have been eating in this tavern that became one of my favorite places.
It may be due to the fact that the memories I have there are linked to Lake Powell, regardless, if I'm ever near Green River I make it a priority to stop. I have yet to eat something there that I don't enjoy.
Ray's may be a hole in the wall.
It's debatable.
But it's still my favorite diner.
This past weekend I went on an overnight trip to Moab and, of course, had the privilege to finish off my excursion with a Ray's burger. I got their cheeseburger and my friend, Ivonne, ordered a bacon burger. One cool thing about their burgers is they give you all the condiments and toppings on the side, so in essence, you build your own burger. It also comes with a huge helping of fries.
I've tried their burgers, chicken, chicken strips, steaks, and salads. All of which I recommend. You can't go wrong.
.
Each burger is made to order and fresh. Since it's a small local business, they use fresh potatoes for their fries and their toppings are prepared by hand.
The moment you sink your teeth into that juicy, tender burger, you savor the taste of fresh, hot food you've been deprived of since you started your camping trip. The cheese is delicious. It is not that fake, plasticky stuff you get from typical fast food joints. I dump about half the bottle of fry sauce on my burger to clearly prove my loyalty to Utah and its fry sauce fanatics.
PSA: RAY'S TAVERN DOES INDEED HAVE LARGE AMOUNTS OF FRY SAUCE, MIXED AND READY.
I always shed a tear of happiness when burger joints have fry sauce available and not just ketchup. All praise to the Fry Sauce Gods.
Ray's tavern is definitely a place to add to your itinerary. Don't drive by Green River without stopping to try it out. You will not be disappointed. Waltz in, sit at the bar, let your hair down, eat a burger and fries, make some jokes, have the time of your life, leave the tavern with your life a million times better and realize you have just had all your dreams come true. You're welcome!
Also, If you want to see what Ivonne and I were up to in Moab, check out the video we made!
Wednesday, January 27, 2016
The Easiest & BEST Coffee Cake Known to Man
You can only handle so many bowls of cold cereal every morning before you get sick of bran flakes and Cocoa Puffs. Let me save the day! I present to you my favorite rise-and-shine breakfast: Coffee Cake.
Is this really breakfast? Is it really healthy and filling? Is this really something you want to eat when you start off your day? I don't know the answer to the first two, but I do know it's super easy and unbelievably good, so yes, you do need this to start your morning.
This recipe came from the family, once again. To be honest, someone probably got it off of the back of a Bisquick box or something and it ended up in the family cookbook. Regardless of where it came from, it's a cherished gem that has been feeding the messy-haired, sleepy-eyed, sometimes grouchy, early morning Crandall risers since at least 1968.
This cake is moist, flavorful, and filling. It is a super easy recipe because it's made up of Bisquick. I highly recommend everyone keep Bisquick mix as a staple in your pantry. You can make so much from it.
You simply just dump the Bisquick, milk, eggs, and sugar in a bowl, mix it up and voila! You're halfway there.
Secondly, you just mix up the topping and sprinkle it on the top. HOW SIMPLE!? You can make it into a cake or portion it out in a muffin tin and make coffee cake muffins for an on the go option!
Fun hint: In the video above it shows me adding flour to the chocolate chips. I do this so that they don't all sink to the very bottom of the cake when I mix them into the batter.
Chocolate Chip Cinnamon Crumble Coffee Cake
2 1/3 cup Bisquick (divided)
1 egg
2/3 cup sugar (divided)
2/3 cup milk
2 teaspoons cinnamon
4 tablespoons butter
1/2 cup chocolate chips
chopped walnuts (optional)
Combine 2 cups Bisquick, eggs, milk, and 1/3 cup sugar. Stir in chocolate chips. Pour into a greased 9x9 pan. For the topping, combine 1/3 cup Bisquick, 1/3 cup sugar, and cinnamon. Cut in butter. Add nuts to the crumble mixture. Sprinkle on top, and bake at 400 degrees for 20-25 minutes.
Tuesday, January 19, 2016
Mildred's Chocolate Ice Cream
a. When it's really hot outside
b. When you've finished all your dinner
c. When it's 20 degrees outside in the
middle of January
Trick question, the answer is always. It's Always the
perfect time to eat ice cream.
So why not in the middle of this Utah winter, break out the
ice cream machine and make some homemade goodness? Yeah, I can't think of a
reason going against that plan either.
This redheaded, beauty queen who never left the house
without being perfectly done up, knew how to cook. She was that grandma that
would shove food into your hands right as you walked through the door. She
would never let you go hungry and would always have something to offer you. S/O
to grandma great for still keeping us fed today with her brilliant
recipes.


Her homemade ice cream recipe is super simple and nothing
short of delicious. It reminds me of a Wendy's Frosty. You just mix up all the
ingredients, throw it in an ice cream machine, and after you wait for what
feels like three days, the ice cream will be frozen, soft, and ready for your
belly!
Here's a quick video of the basic recipe.
Note: I did put the mixture in the blender and blend it
because I felt like the whisk wasn't doing well enough. I also lacked the
patience. So you can mix it in a blender as well!
Mildred's Chocolate Ice Cream
1 quart heavy cream
2 quarts milk
6 eggs
2 tablespoons vanilla
1/4 teaspoon salt
12 ounces Hershey's Chocolate Syrup
Mix all above ingredients. Use an ice cream machine to
freeze, takes anywhere from thirty minutes to an hour and a half. Layer ice and
rock salt around the ice cream container. When done, pour into an airtight
container and store in the freezer (that is if there is even any leftovers).
Enjoy!
Thursday, November 20, 2014
I Sold my Soul to Cafe Trio
This recent addiction came on
when Lexi Crandall and I discovered a little piece of heaven on earth. It is
located at 680 South and 900 East in Salt Lake City. Behold, Café Trio. Ah, just picture a chorus of
angels descending from heaven singing hymns of praise surrounding this sacred
vicinity.
Image from triodining.com
The
Trio Experience
It is a modern restaurant that
serves traditional Italian food.
When I say Italian food I mean
it. None of the crappy Americanized Italian food. It blows Olive Garden out of
the water. Trio’s claim to authentic Italian dining is backed up by Lexi’s
expertise. She traveled to Italy on a Study Abroad last summer. She knows that
Trio is the real deal. This restaurant is brilliant to say the least.
Lexi ordered the pomodoro braised
meatballs served over a creamy polenta. At first I thought she was insane.
Granted, I was not a fan of meatballs. Especially when it was on a bed of some
unknown creamed substance. I thought it was weird to order something like this.
Then I tried a bite.
My life has never been the same
since.
My fork glided right through the
tender, moist meatball. The steam rose off the soft pink beef as I split it in
half. I stuck my fork into the small piece, and slid it through the smooth polenta.
The sauce coated both the meatball and the polenta. I raised the fork to my mouth. The moment it
touched my tongue, I knew it was love. The meatball almost melted in my mouth.
The polenta was rich and creamy. An excellent duo. I scraped the plate clean. I
did everything I could to get every last bit of the dish into my mouth. I owe a
big thanks to Lexi for sharing her appetizer. And by sharing, I mean letting me
devour the whole thing.
The Basic Construction of the Dish
Pomodoro is a simple tomato sauce. Tyler
Florence has basic instructions on how you can prepare it. You can find it
here: http://www.foodnetwork.com/recipes/tyler-florence/pomodoro-sauce-recipe.html
The sauce consists mainly of
tomatoes, onion, garlic, and seasonings.
This isn’t the exact recipe that was on Trio’s meatballs and polenta,
but it will send you in the right direction.
The meatballs were insanely moist
and seasoned perfectly. If you aren’t familiar with a meatball, you need to get
out more. If you want a good recipe, ask your grandma. Family recipes are the
second best thing to Trio.
Now to the main event:
The
Polenta.
Before my first encounter with
this magnificent grain, I was living a subpar life. Polenta can change your
life everybody! After having no clue what in the world it was, I did some
research.
(TIME inc. Health, March 2005, vol. 19 Issue 2, p170-172)
Image from frenchrevolutionfood.com
Sounds weird to eat with
meatballs huh? That is what I thought. You have to give it a chance. You’ll end
up giving it your whole soul nonetheless.
After leaving the restaurant, my
cravings began. For weeks all I wanted was another delectable dish of Trio’s
polenta and meatballs.
The
Creation
Due to the long commute, I had to
result in playing around with polenta myself.
After looking through a plethora
of recipes I created my own. It’s based on two recipes I found from Ina Garten
and Bon Appetit Magazine. Their original recipes can be found here: http://www.foodnetwork.com/recipes/ina-garten/creamy-parmesan-polenta-recipe.html
For Alisa’s POLENTA
2 cups chicken stock
1 cup water
1 cup water
1
cup polenta (NOT corn meal)
1/4 cup parmesan cheese
6 tablespoons butter
1/4 cup heavy cream
1/4 cup heavy cream
Start
by adding the chicken stock, water, and salt to a large pot. Bring this to a boil. Once
it is boiling add the polenta slowly while whisking constantly. If you whisk it
continuously it will ensure that you won’t get lumps. After all the polenta is
added, you’ll turn the temperature down to medium low heat. Simmer the mixture
for about fifteen minutes, or according to the package’s specific cooking
directions. After it has thickened and is still creamy, add the cheese, butter,
and cream. Once it is all melted and incorporated, devour.
You’ll be licking your plate clean!
All in all,
You can check out www.triodining.com
for more information on their restaurant and their menu. If you are in the
area, I highly recommend stopping by. I give it five stars. You won’t be
disappointed. You’ll probably even run into me there.
Monday, December 23, 2013
Chocolate Crinkle Cookies
Chocolate Crinkles, or according to Uncle Bret "choc-ey crinks". These cookies have been I'm the Crandall family cookbook since as long as I can remember. When I was little, my mom would always mix up the dough for me and my brother Mitch and we would eat it by the spoonful. Probably not the most nutritious after school snack, but definitely a delicious one!
These gooey chocolate cookies are so soft and the powdered sugar coating really adds that extra sweetness. You start off making these cookies by combining sugar, cocoa, oil, butter, and vanilla. Once that's mixed then add the eggs one at a time. Then add your dry ingredients and mix until the dough really comes together.
This is a very moist, sticky dough. And depending on the altitude and amount of moisture in the air the amount of flour will differ. My mom would always do a test cookie then add more depending on it's results.
After the dough is completed, roll into balls (or use a cookie scoop) and drop it into a bowl of powdered sugar. Roll the dough around until it is completely coated. Place on a cookie sheet and bake at 350 for 8-12 minutes depending on the size!
Voila!!
Chocolate Crinkle Cookies
2 cups white sugar
1/2 cup cocoa powder
1 1/2 tablespoons butter
1/2 cup oil
1 teaspoon vanilla
4 eggs
2-3 cups flour
2 teaspoons baking powder
1 teaspoon salt
Blend the first five ingredients until comes together. Then add in eggs one at a time, beating well after each addition. Add the flour, powder, and salt. Roll into balls and coat with powdered sugar. Bake at 350 degrees for 8-12 minutes
Tuesday, November 5, 2013
Scotcheroo Bars
These gluten free treats go by so many various names. My family calls them Scotcheroos or Rice Crispy Oh Henry Bars, but you could have known these as something else.
They are super simple to whip up. I like making them because they make a whole cookie sheet worth with only a little effort. These are my go to treats when I'm feeding larger quantities of people.
These ones that are pictured were made for a kid in my Calculus class's birthday. Hence the festive rainbow sprinkles (;
The Recipe is all follows :
8 cups crisp rice cereal
1 cup corn syrup
3/4 cup granulated sugar
1 cup peanut butter
12 ounces milk chocolate chips
12 ounces butterscotch chips
Start by boiling the corn syrup and sugar until all the sugar dissolves. Then remove from heat and mix in the peanut butter till completely melted and smooth. Pour over crisp rice cereal and mix until completely coated. Press into cookie sheet pan.
Then while it cools, melt both chocolate chips in the microwave (using 30 second increments) and spread over the top of mixture in the cookie sheet.
Place in the refrigerator until the chocolate sets and becomes firm. Cut into squares and enjoy(:
Have you made these before? What are your thoughts on this recipe? Comment Below!!(:
Thursday, October 31, 2013
Oreo Truffles
Out of everything that I make, These little balls of heaven are what people always request. They are ridiculously easy, far from nutritious, and insanely addictive. If you share them with anyone, just be prepared because they most likely will ask you for more.
These are made up of only three ingredients, Oreos, cream cheese, and white chocolate for dipping. When you first bite into this little hand dipped Oreo Ball the hardened white chocolate flakes off into your mouth. Followed by a burst of chocolate. The inside dough is rich and soft. The combination of these ingredients produces a very sweet end product and the cream cheese blends it all perfectly together, adding a small amount savor.
The easiest way to make this, and I highly recommend using a food processor. That way you don't get stuck crushing it all by hand. First add all the Oreo's and blend them into crumbs. Then add the cream cheese in small chunks. The temperature of the cream cheese is a great contributing factor that determines how much you need to add. So I usually add half of the block, and then drop it in by the spoonful until it all comes together to form a soft dough.
After it's well blended and no Oreo cookie clumps remain, roll into small, quarter sized balls. At this point you can freeze them before you dip them, or if they are firm enough you can just dip them right then.
Once they are hardened, you can help yourself & indulge(:
1 package Nabisco Oreo cookies
8 oz. Cream Cheese
2 pkgs. white chocolate morsels
Blend Oreos and cream cheese together until a dough forms. Roll into quarter sized balls and place on a cookie sheet. Melt the white chocolate in the microwave (30 second increments) Dip the balls into the white chocolate and sprinkle with Oreo crumbs, or drizzle with milk chocolate. Let harden before serving.
Subscribe to:
Posts (Atom)